Wednesday, September 30, 2009

Blackened Cumin-Cayenne Tilapia with Roasted Potatoes

This is another recipe out of the September issue of Cooking Light that my mother-in-law sent me. I told you I had marked several!!! :o)

I love Tilapia. It is cheap, delicious and easy to prepare! I was really pumped about this recipe because I had recently gotten some Tilapia on sale. I hadn't cooked it up yet, because I was still searching for a great recipe. So when I saw this recipe, I immediately put it on our weekly dinner menu.

The fish turned out beautifully. It was so moist and flaky, and the outside had a nice crunch from being under the broiler. I paired the fish with roasted potatoes. I actually make these from time to time, but I thought this time around I would use the same seasonings that the fish used. They turned out amazing!

Blackened Cumin-Cayenne Tilapia
1 tablespoon olive oil
4 (6-ounce) tilapia fillets
2 teaspoons ground cumin
1/2 teaspoon salt
1/2 teaspoon garlic powder
1/2 teaspoon ground red pepper
1/4 teaspoon freshly ground black pepper
Cooking spray
Preheat broiler.

Rub oil evenly over fish. Combine cumin, salt, garlic powder, and peppers; sprinkle over fish. Arrange fish on a broiler pan coated with cooking spray; broil 5 minutes or until fish flakes easily when tested with a fork or desired degree of doneness.
Roasted Potatoes
(from the kitchen of Liesl)
2 Large Potatoes, cut in 1 inch pieces
1/2 teaspoon ground cumin
1/2 teaspoon salt
1/2 teaspoon garlic powder
1/4 teaspoon ground red pepper
1/4 teaspoon freshly ground black pepper
about 2 tablespoons olive oil
Preheat oven to 350 degrees.
Combine all spices with olive oil. Toss potatoes in olive oil mixture until evenly coated. Spread potatoes on a backing sheet lined with foil and sprayed with cooking spray.
Cook for 25 - 30 minutes or until fork tender.
**If you don't want to use the same flavors as the fish, you can always toss the potatoes with just salt and pepper and then roast them.**

Nutritional Information for the Tilapia:

Calories: 159
Fat: 5.8g (sat 1.2g,mono 3.1g,poly 0.9g)
Protein: 25.9g
Carbohydrate: 0.9g
Fiber: 0.5g
Cholesterol: 64mg
Iron: 1.1mg
Sodium: 364mg
Calcium: 22mg

Tuesday, September 29, 2009

Grilled Corn and Potato Chowder

You all really need to try this soup!

It is so delicious, and really isn't bad for ya!

My wonderful mother-in-law sends my husband and I occasional goodie boxes! Most of the time, she is sending us weeks worth of coupons, but she never just sends the coupons. There is always some little "goodie" in the package! The last one she loaded down with tons of magazines for my reading pleasure. One of them was the September issue of Cooking Light. I was so excited to look through it, and sure enough I was dog-earing about every other recipe! I came across this recipe for Grilled Corn and Potato Chowder, and I knew I had to make it right away. With the seasons starting to change and the chill of fall starting to make its presence in the air, I knew this soup would be perfect!

I think my favorite thing about this soup was the fact that you take a portion of the corn and process it in a food processor. It acts as the thickening for the soup and also makes the soup "creamy". This way you don't have to use all that heavy cream that normally goes into a soup like this. The original recipe actually does call for a 1/2 cup of half and half, but I just used more skim milk instead.

I do hope you will give it a try, it was so delicious! I actually made a double batch so I could stick some of it in my deep freezer for another rainy cold fall day down the road! God bless my deep freezer!! :o)

Grilled Corn and Potato Chowder
(adapted only slightly from Cooking Light)
1 pound small red potatoes, quartered
1 tablespoon salt, divided
3 tablespoons softened butter, divided
4 ears shucked corn
Cooking spray
3/4 cup finely chopped onion
1/8 teaspoon ground red pepper
3 1/2 cups skim milk
2 thyme sprigs
3 tablespoons finely chopped chives
1 1/2 teaspoons chopped fresh thyme
1/2 teaspoon freshly ground black pepper
dash of garlic salt
Preheat grill to medium-high heat.

Place a grill basket on grill.

Place potatoes and 2 teaspoons salt in a saucepan; cover with water. Bring to a boil; cook 2 minutes. Remove from heat. Let potatoes stand in hot water 5 minutes. Drain; cut into 1/4-inch cubes.

Melt 1 tablespoon butter; brush evenly over corn. Place corn on grill rack coated with cooking spray. Place potatoes in grill basket coated with cooking spray. Grill corn and potatoes 15 minutes or until slightly charred, turning occasionally. Cool corn slightly; cut kernels from cobs. Place 1 cup corn kernels in a food processor; process until smooth.
Melt remaining 2 tablespoons butter in a medium saucepan over medium-high heat. Add onion; sauté 3 minutes, stirring occasionally. Add remaining 1 teaspoon salt and red pepper; cook for 30 seconds, stirring frequently. Stir in potatoes, remaining corn kernels, pureed corn, milk, half-and-half, and thyme sprigs; bring to a simmer. Reduce heat; simmer 20 minutes, stirring occasionally. Discard thyme sprigs. Stir in chives and remaining ingredients.
Here is the nutritional information from the magazine, although I am guessing the fat was lower (maybe even the calories) from not using any half and half.
Calories: 268
Fat: 12.3g (sat 6.6g,mono 2.2g,poly 0.4g)
Protein: 9.9g
Carbohydrate: 33.8g
Fiber: 3.1g
Cholesterol: 32mg
Iron: 1mg
Sodium: 599mg
Calcium:214mg

Friday, September 25, 2009

Mini Oreo Cheesecakes

I am sure you all know by now of my not-so-secret-sudden-obsession with Miss Martha Stewart!! I admit, I was a little stand-offish at first, but I have since learned to let all that go! She really has some fantastic cookbooks and magazines out there. I love her Everyday Food Magazine, and I especially love her two recent cookbooks!!! (Martha Stewart Cupcakes and Martha Stewart Cookies) I can't seem to stay away from her recipes. I really have yet, knock on wood, to be let down by one of her recipes! If you are like I used to be about Martha, maybe you too should take a step down and see what all the fuss is about...take it from me, it's totally worth it!


So this past weekend, I was going to someones house and needed to bring a dessert. I knew right away that I wanted to make something out of Martha's Cupcake Cookbook, I just wasn't sure what to make. I mean there are so MANY recipes I am dying to try out! That being said I flipped through the book and decided on her Mini Oreo Cheesecake Cupcakes. They looked so cute and I loved the idea of the whole Oreo on the bottom acting as the "crust" of the cheesecake.
The cupcakes turned out perfectly! They had a great flavor and completely satisfied my sweet tooth (which can sometimes be difficult!). The cheesecake was smooth and creamy and the little bits of oreos swirled throughout was just enough. No glass of milk needed to dunk these oreos that's for sure!
Mini Oreo Cheesecakes
42 Oreos, 30 left whole, and 12 coarsely chopped (this is almost 1 whole package of Oreos)
2 pounds cream cheese, room temperature (or 4 8 ounce packages)
1 cup sugar
1 tsp vanilla extract
4 large eggs, room temperature, lightly beaten
1 cup sour cream
Pinch of salt
Preheat oven to 275 degrees.
Line standard muffin tins with paper liners. Place 1 whole cookie in the bottom of each lined cup.
With an electric mixer on medium high speed, beat cream cheese until smooth, scraping down sides of bowl as needed. Gradually add sugar, and beat until combined. Beat in vanilla.
Drizzle in eggs, a bit at a time, beating to combine and scraping down the sides of the bowl as needed. Beat in sour cream and salt. Stir in chopped cookies by hand.
Divide batter evenly among cookie-lined cups, filling each almost to the top. I used my Pampered Chef Large Cookie Scoop to evenly fill my cupcake liners. (I also was able to make 32 cupcakes, the recipe says it makes 30.)
Bake, rotating pan halfway through, until filling is set, about 22 minutes. Transfer to wire racks to cool completely. Refrigerate at least 4 hours (or up to overnight). Remove from tins just before serving.

Wednesday, September 23, 2009

Sweet and Sour Chicken

Gosh, I didn't want to post this, the pictures just don't do this meal any justice :o( But I couldn't resist not sharing a GREAT meal with you. So that being said, if you want to see more eye appealing images check out the Brown Eyed Baker's blog where I found this recipe!

This meal was so delicious! I really couldn't believe how easy it was to get that great Chinese take-out meal at home. I had no idea that it would turn out this good. I love take-out Chinese. I try not to get it that often because I always pig out and then feel like complete crap afterwords! This meal was perfect, it made about 4 servings, so I had just enough to take for leftovers the next day!!

I served mine with Jasmine Rice and Sugar Snap Peas, but you could certainly use brown rice (or even some homemade fried rice) and your vegetable of choice. If you don't have anything planned for dinner, and happen to have these ingredients on hand, please RUSH home and make this meal tonight!!! It is incredibly delicious!!! You won't want take-out again!
Sweet and Sour Chicken
For the Chicken:
3-4 boneless, skinless chicken breasts, cut into 1 inch chunks
Salt and pepper, to taste
1 cup cornstarch
2 eggs, slightly beaten
¼ cup canola oil

For the Sauce:
¾ cup sugar
4 tablespoons ketchup
½ cup vinegar (preferably rice or white)
1 tablespoon soy sauce
1 teaspoon garlic powder
Preheat oven to 325 degrees.

Season chicken with salt and pepper.

Working in two batches, toss the chicken pieces in cornstarch and then coat with the egg. Heat the oil over medium-high heat and again in two batches, brown the chicken, turning it so that all sides are browned.

Place the chicken in a single layer in a 9×13 baking dish.

Whisk together the sauce ingredients in a small bowl and pour evenly over the chicken. Turn the chicken to ensure each piece is coated.

Bake for 1 hour, turning the chicken every 15 minutes.

Monday, September 21, 2009

Easy Lemon Cookies

First things first...

Sorry I have been M.I.A. for so long (or at least it feels that way). I have missed you all! I just have been in a slump...partly because I keep making all these delicious treats, but have a crappy camera that doesn't do my meals/treats justice :o( But have no fear, I haven't forgotten my readers and I do have lots of great recipes I want to share with you all! (just don't judge me for my crappy photos!)
Now onto a recipe you will want to bookmark!

I love lemon. It is so refreshing! What I love even more ... baking with lemon!! I have seen different takes on the cake mix cookie around the blog world and was intrigued by it. After all, sometimes an easy recipe is just what we need in a pinch, isn't it!?! A friend of mine over at So Sinful, So Sweet, recently posted her take on the Cake Mix Cookie. I think what really caught my eye was the lemon glaze on top!

These cookies were so unbelievable! I really can't put it into words. I liked using fresh lemon juice better, I think it added more of a "bite" to every bite! :o) And the glaze...oh that glaze!!! Again the bitterness of the lemon juice combined with the sweetness of the powdered sugar would hit you at just the right moments and start a flavor party in your mouth! Man I want another!!! LOL Can you tell!?!? :o)

The cookies are seriously so easy! If you can open a box and crack and egg, then these cookies will be your new best friend! People wouldn't even be able to guess that you didn't labor for hours over them! I am actually going to try my hand at some other varieties and see how they turn out. Enjoy!!
Easy Lemon Cookies
(recipe adapted from So Sinful, So Sweet)

1 pkg. lemon cake mix
1 - 2 Tablespoons of freshly squeezed lemon juice **
1 egg
1/3 cup oil
**Start by adding 1 Tablespoon, if the batter doesn't combine add a little bit more at a time. Just until you are able to form the dough into balls. I found I needed more than 1, but less than 2 Tablespoons.**
For Glaze:
3 Tablespoons freshly squeezed lemon juice
1 cup powdered sugar (or just enough to make your glaze smooth but not too thick)

Combine all ingredients into a bowl. Drop by teaspoons (1 inch balls), or use a small cookie scoop, onto an greased baking sheet.
Bake at 375 degrees for 8-10 minute, until the edges are slightly golden. Allow cookies to rest on the baking sheet for 1 minute. Remove and transferring to a cooling rack with parchment paper underneath.
Make a glaze by combining lemon juice and powdered sugar. Drizzle over cooled cookies.
Makes about 2 1/2 dozen cookies.

Monday, September 14, 2009

Pigs in a Blanket

Let's face it...sometimes we all need a little comfort food.

A couple weekends ago, I got home from work on Friday night, after a long week at work. I was tired. I didn't feel like hitting the gym or cooking dinner. But of course I was hungry so I had to come up with something. I poked around the fridge and realized that I had all the ingredients to make a childhood favorite of mine - Pigs in a Blanket. This was exactly what I needed! Something simple and delicious!

It seems like everyone has their own way of making these delicious little treats. Naturally, I am biased and think my version is the tastiest!! :o) I use Velveeta cheese, and I think that is what makes them so yummy!

These would make great party appetizers, and would also be great after school snacks for kids! They are super easy to make, very inexpensive and full of flavor! I can't say that they are healthy, but we all need a little "unhealthy" every once in a while don't we!

Look at all that ooey, gooey melty cheese! YUM!

PIGS IN A BLANKET
(from the kitchen of Liesl)
4 beef hot dogs, cut in half
1 package of reduced fat refrigerated crescent rolls
2 slices of Velveeta cheese (cut about 1/4 inch thick)
Preheat oven to 375 degrees. Spray a cookie sheet with non-stick cooking spray.
Take each half of the hot dogs, and cut a slit down the center. Be sure not to cut all the way through the hot dog. You just want a nice slit for the cheese to sit in. Take the 2 slices of Velveeta cheese and cut each slice into fourths. (This will yield 8 rectangles of cheese that fit perfectly in your hot dogs.) Carefully place 1 piece of cheese in each hot dog half.
Roll out crescent rolls. Starting at the long side of each crescent roll, place the cheese filled hot dog down and roll it up like you would if you were just cooking the crescent roll. Continue with the rest of the hot dogs and rolls until you have finished. You will end up with a total of 8.
Cook for about 12-15 minutes or until rolls are golden and cheese is melted.

Thursday, September 10, 2009

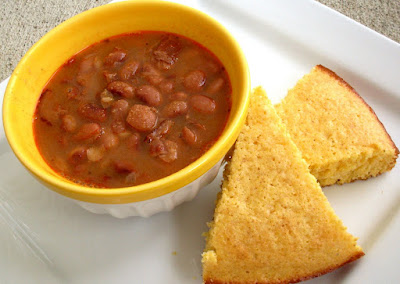
Slow Cooker Pinto Beans and Cornbread

The other weekend I had a craving for a good ole southern meal.

What is that you asked?

Well, I was wanting some pinto beans and cornbread! Yes I was born and raised in the north, but I guess my mind, body and taste buds were always a little bit southern! (maybe that is why I knew I had to move down here!)

I really haven't ever made pinto beans myself, but I really do love them. I have made lots of crock pot beans, mainly black beans, so I didn't think that figuring out a recipe would be that big of a challenge. I actually turned to my southern pal, Miss Paula Dean for some help! I used her recipe, which I found at Food Network's website, as a guide. I made several changes to the recipe, so if you want the original Paula Dean version check out her recipe.

Everyone seems to have their own "go-to" recipe for cornbread...at least here in the south they do! Southerners are serious about their cornbread! (I actually went to a cornbread festival here in TN last year and tasted some really unique versions of cornbread! It was a blast!) Cornbread for me, sorry to break it to y'all, has to be sweet :o) Now don't get me wrong, I like southern cornbread, but given the choice I want sweet. That's the northerner in me coming out! Unfortunately, I didn't have any fresh ground cornmeal left (I usually buy it locally) so I turned to my trusty, no fail recipe - JIFFY! Jiffy is great to keep on hand. I just follow the recipe on the back of the box and add about 2 tablespoons of sugar to the mix. Stir it all up, pour it in a greased 8 inch cake pan, and in about 10 minutes you will have yourself some tasty cornbread!

Slow Cooker Pinto Beans
(adapted from Paula Dean's recipe)
1 pound dry pinto beans
1 teaspoon chili powder
1 teaspoon dried oregano
7 - 10 slices of bacon, cut into small pieces (I cooked my bacon first, but you don't have to)
2-3 cloves of minced garlic
2 cups water
2 cups of chicken stock
1 onion, chopped
Garlic salt
Season salt
fresh cracked pepper

Wash the beans and soak overnight in cold water. Drain the beans in a strainer and rinse with cool water. Dump into slow cooker. Stir in chili powder and oregano.

Add bacon and minced garlic to slow cooker with beans. Add about 2 cups of water and 2 cups of chicken stock, or until beans are covered. Add onion to slow cooker with beans and meat. Stir well.
Season, to taste, with garlic salt, season salt and pepper. Cover the pot, and cook on high until beans are very tender, about 5-6 hours.
Serve with cornbread.

Monday, September 7, 2009

"Through My Lens" Contest

I am so excited to write and share this post with you all! I have been following the Culinary Snapshot blog for quite some time now. The blog is dedicated to food photography. You basically submit your before and after photos with descriptions of how you photographed your food, with what camera, props, etc. It is a great learning tool. I love reading what people do to make their food look great! I especially love reading the tips people share about what things they do in photoshop to make the pictures even more eye catching.

About a month ago, I saw they were doing a contest called "Through My Lens". It basically is a contest that was started where you are given a subject to photograph creatively for that month. You then submit the photos and winners are selected. I wanted to enter the first one (the subject was chocolate chip cookies), but I ran out of time. I was so mad that I missed it. Soon enough the second one was announced...the subject being Peanut Butter and Jelly!

I was so excited about doing this project. I knew that photographing a peanut butter and jelly sandwich would be difficult, but I wanted to do it. I actually insisted that my friend Kristen (Through Kristen's Viewfinder) did it with me. (Since I have a crappy camera, but really wanted to submit something.) She gladly accepted the challenge and we got to planning!

I didn't just want to photograph a "sandwich", so we started tossing around ideas. We had some great ideas, but it actually wasn't until we started getting ready to shoot that we decided on the "A" "B" "C" idea! (I had these cookie cutters packed away in one of my cabinets...sadly this was the first time I had used them, but it won't be the last!) I loved the way it turned out though. I think it was a great way to showcase the classic PB&J in a different and creative way!

So keep your fingers crossed...we are hoping to win! :o) And be sure to check out Culinary Shapshot for the next contest!

Tuesday, September 1, 2009

Homemade Salsa

I had so many tomatoes recently coming out of my garden, that I knew I wanted to make some fresh salsa from them soon. This weekend I set out to do just that! The weather was perfect - it almost felt like fall, with the nice chill in the air! I love the taste of fresh homemade salsa, nothing compares to it in my opinion.
This salsa is truly a "little bit of this and a little bit of that" kind of recipe. I think that is why I like it so much! You really can't make a mistake...and even if you think you have, 99% of the time you can add other ingredients to fix it! I love fresh cilantro in my salsa, really I like it just fresh out of my garden on so many dishes, but it adds so much flavor to salsa. You certainly could scale down my recipe if you don't like as much garlic flavor or cilantro. Just add what you think you would like and then taste it, if it isn't enough add more! Easy as that! Hope you enjoy :o)
Homemade Salsa
(recipe by Liesl)
10-12 fresh garden tomatoes (3-5 of those, with the seeds removed, set aside)
1 jalapeno, seeded
4 garlic cloves
1/2 cup fresh chopped cilantro
1/2 red onion
juice of one lime
good pinch of salt
In a food processor, combine and finely pulse, jalapeno, garlic, and onion. Empty contents into a large bowl. Cut about 7 to 9 of the tomatoes into large chunks. Add to food processor and pulse several times. Empty tomato mixture into bowl with the other ingredients. Cut the remaining tomatoes (the ones without the seeds) into good bite size chunks and add to bowl. (I like to have some larger chunks of tomatoes in my salsa so this is why I do that.) Stir to combine all ingredients. Add the juice of one lime, salt and cilantro. Stir to combine. Serve with tortilla chips.