Saturday, February 14, 2009

A Special Valentine's Day Breakfast!!

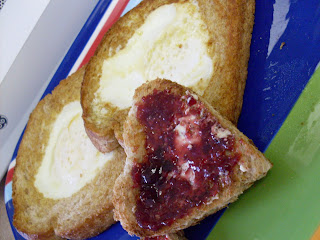
These things are all over the Internet right now! I actually have been making these/eating these all my life! I used to get this for breakfast as a kid all the time...in fact we called them a Bird's Nest! I really wanted to make this for my husband for Valentine's Day morning. I even served them with a special Valentine's milk!!! (just food coloring in the milk...nothing special, but it still looks cute!! It is actually a good way to get someone who doesn't drink milk to drink milk!! LOL)
Valentine's Bird Nest
2 pieces of whole wheat toast
2 eggs
butter
heart shaped cookie cutter
(if you want to do the milk I just added 2 drops of red food coloring to a glass of milk)
Press cookie cutter into the middle of each piece of toast. Set the hearts aside. Melt butter over medium heat in a medium sized sauce pan. Place bread with the heart cut out in pan. Crack egg and carefully put it in the "heart" hole of the bread. I usually cover my pan with a lid to help the egg cook. Carefully flip toast with the egg in it. Cook until how you like to eat your egg...we like over easy so it doesn't take long. Toast the hearts in the toaster and serve with butter and jelly!

Wednesday, February 11, 2009

Jalapeño Popper Dip

This dip is certainly one of my new favorites. I found it a while back when I was looking for ideas for the Superbowl party I was having. I saw it on Big Red Kitchen's Blog and thought it sounded amazing! My husband and I really like spicy things...and I love Jalapeño Poppers...so this dip is a definite keeper on my list! It was so creamy and tasted wonderful on the crackers I had. I actually had quite a bit of this dip leftover from the party so for dinner one night I grilled some chicken and towards the end of the chicken being done, I spread some of the dip on top. I let it cook long enough for it to get nice and melted on top of the chicken. THE CHICKEN WAS SO GOOD!!! We actually liked it so much I made it two nights in a row!!! So if you make this dip and have leftovers you should give that a try!!
Jalapeño Popper Dip
(adapted from Big Red Kitchen)
2- 8 ounce packages fat free cream cheese, softened
1 cup lite mayonnaise
1 cup shredded Mexican blend cheese
1/2 cup Parmesan cheese
1- 4 ounce can chopped green chilies
1- 4 ounce can sliced jalapeños
1 cup panko bread crumbs
1/2 cup Parmesan cheese
3/4 stick butter, melted

In a food processor add the first 6 ingredients and process until smooth. You do not need to drain either can of peppers, but I drained the jalapeños so it wasn't as spicy. Spread the dip into a greased 2 quart casserole. I actually made this the day before I served it. So I let the dip sit in the fridge overnight to let the flavors would mingle!! I think it may have made it better. I put it in without the bread crumbs so they wouldn't get soft. The next day I just pulled it out of the fridge and added the bread crumb mixture.
In a bowl mix bread crumbs and the other 1/2 cup of Parmesan cheese. Pour melted butter over top crumb mixture and mix well. Sprinkle crumb mixture evenly over the dip and bake in a 375° oven for about 20 minutes. You want the top to get browned and the dip to be heated through and bubble gently on the edges. Do not over heat this dish or the mayonnaise with separate and you will have a grease puddle in your dip. I served this on Buttercrisp Toasteds and it was delicious!
-Photography by Kristen Wiltse

Buffalo Hot Wing Dip

I LOVE THIS DIP!!! I had heard about this type of dip a while back...my best friend from High School was telling me about it. So I started experimenting with it and different ingredients and came up with a dip that my husband and can't get enough of!!! I really like this take on the Dip best. I have had many other varieties of it and they aren't as thick and tasty as this one is. Some are also too cheesy...this one is perfect. Just the right about of Cheese, Chicken and SPICY!! You can always make it as spicy as you want my adding your favorite Hot Wing Sauce. Our favorite way to eat it is on Celery, but you could serve it with Chips, Crackers and I think even Pita Bread would be good. If you have any sort of liking for Hot Wings, you must try this dip!! Buffalo Hot Wing Dip
(Kitchen of Liesl)
2 8 oz packages of light cream cheese softened
3/4 cup Buffalo Hot Wing Sauce (we use a Mild flavor)
1 cup Light Ranch Dressing
8 oz reduced fat Blue Cheese Crumbles
3 full cups shredded rotisserie chicken (I have tried several flavors and they all work well...even lemon pepper!)
8 oz cheddar cheese
Preheat oven to 350. Mix all ingredients together in a large bowl. Grease a 9x13 baking dish (sometime I half this recipe and cook it in an 8x8 pan) and spread dip mixture into baking dish. Heat dip about 15 minutes or until heated through and cheese is melted. Serve with Celery and Tortilla Chips. We like it best with Celery!!!
-Photography by Kristen Wiltse

Monday, February 9, 2009

Mexican Dip

I really love dips, and if you have been reading my blog at all over the coarse of the last week, you probably already guessed that!!! Dips are just so easy and fun for any party...really for any day!! I can't wait to make this dip again...yes it was THAT GOOD! My husband and I were actually happy to see that we had a good amount of this dip left after our party, and we ate off of it for the next couple of nights!!! It is similar to a seven layer dip, but it isn't seven layers!! I really don't think it is that bad for you either; (since I always try to use low-fat substitutes) of coarse that is enforcing portion control, which I have a VERY hard time doing with a dip!! haha

The only thing I would change with this recipe is that the Jalapeno's on top were too much, I think they would have tasted better chopped up and sprinkled on top of the cheese...that way you would get smaller pieces of the Jalapeno with each bite. I got this recipe from a friend of mine, really by accident. Back when I was wanting to make Mushroom Risotto, she told me about this cookbook she had. I was looking through the cookbook to find the Mushroom Risotto and came across this dip. I knew it sounded delicious and decided to make it for our Superbowl Party. I was so easy to put together. I actually made it the day before and let it sit in the fridge. It probably made it taste even better by letting the flavors mingle awhile!!
1-2-3 Mexican Dip
1 16 ounce can fat free refried beans
1 1/2 cups medium salsa
1 teaspoon chili powder
1 teaspoon ground cumin
3/4 teaspoon dried oregano
3/4 cup sour cream
1/2 cup lite mayo
1/4 cup finely chopped red onion
1/3 cup chopped fresh cilantro
1 teaspoon onion powder
1 small red bell pepper, chopped
1 cup grated extra sharp cheddar cheese
sliced Jalapeno's for the top (I used the ones from the jar, but you could use fresh)
tortilla chips for dipping
Combine refried beans, 1/4 cup of the salsa, the chili powder, cumin and oregano in a medium bowl. Spread evenly over the bottom of an 8 x 8 inch glass dish (at least 2 inches deep).
Combine sour cream, mayo, red onion, cilantro and onion powder in a small bowl. Carefully spread over the bean mixture.
Combine the red bell pepper and the remaining 1 1/4 cups salsa in a small bowl. Gently spread over the sour cream mixture, being very careful not to mix the layers. Top with the cheese and sliced Jalapeno's and refrigerate until chilled. Serve with tortilla chips.
Toffee Pecan Blondies

There is nothing better in life than dessert...it's such a satisfying food!! Clearly I am still getting around to blogging about all my Superbowl delights...and this one was not a disappointment!! There are many different renditions of blondies out there, so while I was searching for a recipe I was trying to find one that would be easy to make and be able to satisfy my "Toffee Pecan" craving!! I found this recipe on Cook Like a Champion and thought it was perfect. It gives the basic blondie recipe and then gives you a breakdown for your "add-ins"...just what I wanted!! These blondies came out so moist and delicious! They only made about 16 bars (when cut small) so if you wanted more I would double the recipe and bake it in a 9x13 pan.
Toffee Pecan Blondies
6-7 tablespoons butter, melted
1 cup brown sugar
1 egg
1 tsp. vanilla extract
1/4 tsp salt
1 cup flour
1/4 teaspoon baking powder
1/4 cup toffee pieces
1/2 cup chopped pecans
Preheat oven to 350. Line an 8×8 pan with foil and lightly spray with PAM. In a large microwave safe mixing bowl melt the butter. Allow to cool for 5 minutes. Mix the brown sugar with the melted butter and beat until smooth. Beat in egg and then vanilla. Add salt, stir in flour and baking powder. Mix in toffee pieces and chopped pecans.
Pour into prepared pan and use a greased spatula to evenly spread mixture in pan and level the top. Bake for 20-25 minutes or until set in the middle. Cool on rack before cutting.
-Photography by Kristen Wiltse

Wednesday, February 4, 2009

Cake Ball Fever

My first cake balls!!! YIPPPEEE!! I am so excited (can you tell) to blog about these little cuties!! I have been wanting to make cake balls for so long now and thought the Superbowl was the perfect time to try it out with a little "football" theme! I saw Bakerella do something similar and thought they were so adorable! I actually have been reading about cake balls for a long time and always wondered why it is that no one really makes them with anything but chocolate/red velvet cake?? So I decided that I would try it out with a little Funfetti cake action!! THESE CAKE BALLS WERE SO GOOD!! I just can't tell you enough how good they really were, you must try them out on your own! My husband actually said "these things taste like a Ho-Ho!!", and they really did!!
I have only one complaint I must share with you all, these took A VERY LONG TIME TO DO!!! I started on the cake part Friday night and spent a good 3 hours working on them...baking the cake, mixing it up, forming them into footballs, chilling them. I let them chill overnight in the fridge and then dipped and decorated them Saturday morning. It took me another 3 hours for all the dipping/decorating!! So plan some time if you want to do these, but it was well worth all the time, trust me! They were a HUGE success!
Football Cake Balls
(recipe for original cake ball from Bakerella, I changed it up for my footballs)
1 box Funfetti cake mix, cook using directions on the back of the box for a 9x13 cake
1 can cream cheese frosting
1 package chocolate bark
wax paper
After cake is cooked and cooled completely, crumble into large bowl. I used a fork to help crumble it. Mix thoroughly with 1 can cream cheese frosting. A lot of people say to use your hands to help mix it, but it work for me just using a spatula. Roll mixture into footballs and lay on cookie sheet. (My batch made 60 or so footballs!) Chill for several hours or overnight. You can also speed this up by putting in the freezer if you want to do them right away.
Melt chocolate over a double boiler or using the microwave, just be careful not to burn the chocolate. I like melting over a double boiler best, because you can keep the warm water under the bowl of chocolate to help keep the chocolate warm and for longer. Roll balls in chocolate and lay on wax paper until firm. I used a toothpick to dip my cake balls. Decorate as desired.
-Photography by Kristen Wiltse

"Raggedy Robbins" aka Peanut Butter No Bakes!

For as long as I have lived the no bake cookie has been a favorite of mine. The best part about no bake cookies is that it takes no time to satisfy your craving! You don't even have to wait for the cool down...go ahead lick the pan!! That's the part I like best...the warm gooey stuff!

Anyhow, I came across this version of a no bake while looking at Big Red Kitchen's blog. I was drawn to these cookies immediately because of the peanut butter! (if you didn't know by now Peanut Butter and Banana flavored things are my weakness!) Not only that, but I really hadn't ever heard of the "Raggedy Robin" until I stumbled across this recipe. After seeing this recipe I did some research on them and sure enough Raggedy Robin's are everywhere!!! HA Who would have thought!! I knew I would be making these cookies for sure, I just felt like I needed an excuse to do so...afterall, if I keep making cookies (or anything for that matter) just because the recipe looks good, my waist line is going to suffer!! LOL So with the Superbowl party I had coming up, I had a good excuse to try the cookies out. And let me tell you...these are one of my top favorite cookies!! They are so easy to make and so delicious! Everyone loved them at the party. I actually think I may even have liked them better than the chocolate version of the no bake cookie. Give 'em a try...
Raggedy Robin's
2 cups sugar
1/2 cup white chocolate chips
1 stick butter
1/2 cup milk
1 teaspoon vanilla
1/2 cup peanut butter
3 cups quick cooking oats
In a large Dutch Oven mix sugar, white chocolate chips, butter, and milk. Stir over medium heat and bring to a rolling boil. Boil one minute (after rolling boil starts). Remove from heat.
Quickly stir in vanilla, peanut butter, and oatmeal. Working quickly, drop by tablespoons onto waxed paper. I topped mine with some extra white chocolate chips. Cool for 20 minutes.
-Photography by Kristen Wiltse

Tuesday, February 3, 2009

Steelers Rice Krispies Treats

Everyone loves a good rice krispies treat! They seem to be a hit no matter where you take them! I have always loved rice krispies treats, actually I am pretty much known for turning multiple things into the rice krispies format of a marshmallow bar!!! They really aren't all that unhealthy if you think about it either...although marshmallows do have a lot of sugar don't they!? I thought these turned out really cute with the yellow and black drizzled on top. I actually made a royal icing (powdered sugar, water and food coloring) to decorate with, but you could really use anything or leave it off all together. I also have always added vanilla extract to my rice krispies treats. It adds such a nice flavor to the bars.
Rice Krispies Treats
(adapted from Kellogg's)
1/4 cup butter
1 pk 10 oz. marshmallows
1 teaspoon vanilla extract
6 cups Rice Krispies
Melt butter in large deep pan over low heat. Add marshmallows and stir until completely melted. Add vanilla and stir to combine. Remove from heat add Rice Krispies and stir until they are well coated. Using buttered spatula press mixture into buttered 9x13 glass baking dish. Decorate as desired, or eat them plain! Cut when cool.
-Photography by Kristen Wiltse

Monday, February 2, 2009

Touchdown Tea

No party is complete without some form of a cocktail!! I wanted to find something fun and festive to have for the Superbowl Party...after all isn't the cocktail one of the most important parts of a good football game!?! So finding a drink wasn't entirely my only issue, I need to have a drink with a catchy name!!! I know I am a cheese ball, but hey that's what makes it so much fun!! So I looked....and looked....and looked and nothing really struck me. And then I got my friend looking with me....and she looked...and looked and we finally decided on a Touchdown Tea!!! Courtesy of Miss Martha Stewart!!! :o) I made a few adjusts to the original recipe that I think made it much better! I was a little nervous about this cocktail due to it having Tequila in it, but I REALLY loved it. And everyone at the party went crazy over the stuff.

Touchdown Tea
(adapted from Martha Stewart)
4 cups of low pulp orange juice
2 cups of Tequila (I used what they call Blanco or Silver Tequila)
12 tablespoons of fresh squeezed lemon juice
3 ounces of grenadine
Ice for serving
Sprite
Lemon peels for garnish
Pour orange juice, lemon juice and Tequila in a large pitcher. Add grenadine and shake. (you could wait to add this to each individual cup, but I liked the flavor it added combined in with everything)
This is how I served it:
1. I filled my cups about half full with ice.
2. Put about 1 cup of Tequila mixture over ice.
3. Top off with about 1/4 cup of Sprite.
4. Garnish with a lemon peel. To do this I took a potato peeler to the lemons I squeezed and peeled off slices of lemon peel. I then twisted them before putting them into the cups to release the oils and add another zest!
***These are not exact measurements. I am so bad at measuring ... sorry! I really just did the first one to test how it would taste and then judged it going forward. If you have any questions feel free to ask!***
You could half this recipe too, I just had a lot of people so I needed more. They were so yummy!! Some people even said that you could taste the alcohol...that's dangerous!!! :o)
-Photography courtesy of Kristen Wiltse

Cheese Bread Appetizer

These were so delicious and the perfect finger food for a party!! I found this recipe on Bunny's Warm Oven and thought it would be great to have something like this at the Superbowl Party. She actually served it on bread rounds, but I thought it would taste better on toasted french bread slices!!
Cheese Rounds
(adapted from Bunny's Warm Oven)
1/2 c. lite mayonnaise
1/2 c. grated Parmesan cheese (from the green container)
1/4 c. finely chopped red onion
Sliced French Bread
Preheat oven to 350 degrees. Combine mayonnaise, cheese and red onion; mix well. Spread a good amount (about 1 tablespoon) on each slice of french bread. Place on an greased baking sheet. Bake for 8-10 minutes or until light brown and bubbly. Serve immediately.
-Photography courtesy of Kristen Wiltse

Cheesecake Dip and the start of a fantastic Superbowl menu!

A couple of months ago a friend of ours ask us to host the '09 Superbowl Party! We were delighted to take on the challenge! I literally was in the kitchen cooking from the time I got home from work on Friday night to the time of kickoff!!! I was so proud of everything and I can't wait to share all my recipes with you guys!

I had everything organized on tables: dessert table and appetizer table. Each item was label so that people knew what they were eating and I didn't have to tell over 20 people what was what! My husband and I are known for our grill parties, so we host parties where everyone brings something to slap on the grill!! It works out really nicely because then we can just have snacky type foods.
So be prepared...there will be a lot of posts over the next week!!! And trust me, every recipe is worth trying!!!! So without further ado, I start the menu off with a sweet treat (of course!), Cheesecake Dip. This is something I fell in love with a couple of years ago and it always is a party pleaser. It is so easy to make and it tastes delicious on Teddy Grahams. I have always served it with those, but I am sure you could find other treasures to dip in this!
Cheesecake Dip
(from the kitchen of Liesl)


1 8 oz low fat cream cheese softened
1/2 teaspoon vanilla
1/8 cup packed brown sugar
1 teaspoon cinnamon
1 container of thawed lite cool whip
1/2 cup to 3/4 cup mini chocolate chips
cinnamon sugar for topping


In a bowl combine the cream cheese, vanilla, brown sugar and cinnamon. Stir until well combined. Gently fold in cool whip a little at a time, until it is all incorporated. Fold in chocolate chips. Chill for an hour (or longer...you can make this even the day before just keep it covered). Garnish with chocolate chips and cinnamon sugar. Serve with Honey Teddy Grahams.
-Photography courtesy of Kristen Wiltse