Sunday, February 28, 2010

Ho-Ho Cake

This post is sure to make you laugh, cringe, probably think twice about my cooking skills, but MOST IMPORTANTLY it will make you want to go bake a Ho-Ho Cake!!

This all started out as a simple conversation that went something like this......
Liesl: So do you and the boy want to come over and grill out?
Erin: Sure, what should I bring an appetizer or dessert?
Liesl: Hmmm...let me run it past the hubs and see what he thinks. (I only asked this because he ALWAYS is making suggestions as to what he wants me to make!)

later on...
Liesl: So how about I do dessert and you bring the appetizer.
Erin: Sounds good to me!


So you see this started out great, but then there was the conversation with the hubs........

Liesl: Erin asked what she should bring an appetizer or dessert...do you care?
The hubs: Well, actually how about you do dessert. There is this dessert that my mom used to make me and I would love for you to try it out.
Liesl: Oh, great...not again.


This happens to me a lot! The hubs likes to suggest these recipes he used to have growing up. Trust me I've tried to recreate A LOT of "child-hood" memories! I end up calling his grandma or his mom and trying to piece together what the hubs is talking about. His mom was able to dig out her recipe for this so called "Ho-Ho Cake", but she usually makes it for a large crowd of people, so we had to figure out what a third of the recipe would be. So to make a long story longer (lol), she told me it was to be baked in a 9x13 glass dish, but I mentioned how it would be fun to try it jelly roll style (you know like an actual Ho-Ho)...HAHAHAHAHAHAHA THAT'S FUNNY! Well, it didn't quite go as planned, and it sure made for some good laughs, but trust me you Ho-Ho Cake you...WE ARE NOT FINISHED!!


So despite it's resemblance to what my dog used to leave behind in the back yard, the fact that it didn't really roll - it cracked, and the shear disappointment in my face as I tried to spread the frosting on top and it just wasn't happening --- THIS CAKE WAS A-M-A-Z-I-N-G! One of the best I have ever had! I really am not a big fan of chocolate, but hands down, one of the best desserts! Please, go ahead and laugh, but really do try it out. The cake is so moist and the filling reminded me dead-on of a Hostess Ho-Ho. I was so embarassed to serve it to my friends, but they were good sports about it and can attest to how wonderful it tasted!

Ho-Ho Cake
(from the kitchen of my mother-in-law)
For the cake:
2 cups sugar
2 cups flour
1 cup water
1/2 cup butter
1/4 cup cocoa
2 beaten eggs
1/2 cup buttermilk
1 teaspoon baking soda
1 teaspoon vanilla
Preheat oven to 350 degrees.
Combine sugar and flour in a large bowl. Bring water, butter and cocoa to a boil, stirring occasionally. Pour cocoa mixture over flour mixture and mix. Combine eggs, buttermilk, baking soda and vanilla and mix together with the flour cocoa mixture. Pour into a greased 15 x 10-inch jelly-roll pan lined with parchment paper.
Bake for about 15-20 minutes, or until a toothpick comes out clean. Cool the cake for 5 minutes.
Spread a kitchen towel out and sprinkle it with powdered sugar. Loosen and turn cake onto prepared towel. Carefully peel off paper. Roll up cake and towel together, starting with narrow end. Cool completely on wire rack.
For cream filling:
2/3 cup milk
2 1/2 T cornstarch
1/3 cup butter
1/3 cup shortening
1/4 teaspoon salt
2/3 cup sugar
3/4 teaspoon vanilla
In a small saucepan over medium heat, combine milk and cornstarch. Cook until thick, stirring occasionally. Cool completely.
Cream together butter, shortening, salt, sugar and vanilla and add to milk mixture. Mix until smooth.
Carefully unroll cake. Spread cream filling mixture over cake. Re-roll cake.
For chocolate Frosting:
1/2 cup butter
1/4 cup cocoa
1/4 cup milk
1 lb. powdered sugar
1 teaspoon vanilla
In a medium saucepan over medium heat, combine butter, cocoa and milk. Bring to a boil. Add powdered sugar and vanilla to cocoa mixture and mix until smooth. Spread on top of cake. ENJOY!!
If at first you don't succeed, try, try again! ;o)

Thursday, February 25, 2010

Lime Garlic Tilapia

This past weekend, when the hubs and I were at Publix buying steak, we happened to see that Tilapia was on sale. I couldn't pass up the good deal and a chance to try out a new recipe! I love Tilapia, and honestly there are so many recipes out there, you could prepare it differently every time you eat it.

My friend Erin is also a big fan of Tilapia...so this time around I thought I would email her to see if she had a recipe that she recommended. She sent me a nice list to choose from, and I ended up picking something that came from her blog. I had all the ingredients on hand except for lemon, but I knew I had limes and I thought they would taste just as good.

This recipe was not actually prepared by me. That's right, the hubs cooked it! I can not take any credit for it at all! But he did a WONDERFUL job! The fish was cooked perfectly and he even decided to use half a lime and mix it with a little butter to pour over the peas! It was delicious! Thanks Erin for sharing the recipe...and I can't wait to try some of the others you sent!

Lime Garlic Tilapia
2 tilapia fillets
1 1/2 - 2 tablespoons fresh lime juice
1/2 tablespoon butter, melted
1 clove garlic, finely chopped
1 teaspoon dried parsley flakes
fresh cracked pepper to taste
Preheat oven to 375 degrees.
Spray a baking dish with non-stick cooking spray.

Rinse tilapia fillets under cool water, and pat dry with paper towels.

Place fillets in baking dish. Pour lime juice over fillets, then drizzle butter on top. Sprinkle with garlic, parsley, and pepper.

Bake in preheated oven until the fish is white and flakes when pulled apart with a fork, about 30 minutes.

Tuesday, February 23, 2010

Feta Stuffed Mushrooms

I love mushrooms. When I came across this recipe on Pennies on a Platter, I immediately knew I needed to make them soon. We had such a nice weekend in Nashville this past weekend, that was just calling for us invite some friends over and fire up the grill. The hubs was wanting steak, so we splurged and got 2 nice looking filet's at Publix. When we got the steaks, I was wondering what to make with them...that's when I thought of these mushrooms. They were so delicious and I can't wait to make them again!

I added fresh cracked pepper and a bit of fresh cracked garlic to mine. (I love my McCormick Grinders!)
Feta Stuffed Mushrooms
baby bella mushrooms
olive oil
feta cheese
fresh cracked pepper
fresh cracked garlic
Preheat oven to 350˚F.

Remove the stems from mushrooms (you can keep them for salads) and place on a baking sheet, stem side up. Drizzle mushrooms lightly with olive oil. Bake for about 10 minutes. Crumble feta cheese into each mushroom cup, top with fresh cracked pepper and garlic. Bake until golden brown, about 5 or so minutes. Serve warm.

Wednesday, February 17, 2010

Nutella Peanut Butter Hot Chocolate

When I saw this recipe pop up in my Reader, I knew it was something I HAD to make! I LOVE Nutella and Peanut Butter, so I knew right away this was a drink right up my alley! The Chocolate Peanut Butter Gallery is one of my favorite blogs to read...and naturally where I got this recipe from.

Not that you need an excuse to make hot chocolate, but I really wanted to make this on a snowy cold day. I would say that normally it isn't likely here in Nashville, but lately the snow has become an everyday occurrence! So this weekend, which also happened to be Valentine's Day, it snowed and I was craving a warm cup of hot chocolate. The hubs was working on school work, so I told him to keep busy and I was going to whip up a special Valentine's Day breakfast! (Which he didn't know then, but soon found out it was going to include a cup of this delicious hot chocolate!)

I actually added a little more Nutella to my hot chocolate than what the recipe called for and I think it made it even better! The hot chocolate was so creamy, smooth and silky. I love the flavor that the Nutella added. It was some of the best hot chocolate I have every tasted! It was perfect for a Valentine's Day breakfast! The hubs loved it too! This is definitely going to be my go to hot chocolate recipe from now on!

Nutella Peanut Butter Hot Chocolate
3/4 cup whole milk
2 Tbsp Nutella
1 1/2 Tbsp smooth peanut butter

In a small saucepan over medium-low heat, bring the milk to a simmer. Add the Nutella and peanut butter and stir with a wooden spoon until thoroughly blended. Pour into a mug and garnish (if desired) with a dollop of whipped cream. Serve immediately.

Wednesday, February 10, 2010

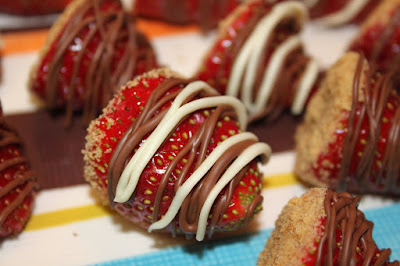
Cheesecake Stuffed Strawberries with Chocolate Drizzle

First some business...

I decided to take part in "Adopt-a-Blogger" this time around. I feel as though I have so much to learn when it comes to blogging. I knew it would be a great way to put myself out there and see what happened. I am so happy to say that I have officially been adopted! My adoptee is Jessica from The Novice Chef! I am super excited about us being paired up and can't wait to get to know more about Jessica! Just by reading her blog it looks like we have a lot in common and could become great friends! She has an amazing blog filled with lots of GREAT recipes, so you should definitely check it out!

In honor of my "adoption", I decided to poke around her blog and see if there was a recipe that I could make. I marked so many of her recipes and didn't know what to pick, finally came to THIS! Cheesecake Stuffed Strawberries!!!!!!!!!!!!!!!!
I actually had a baby shower to go to over the weekend for a good friend of mine and when I saw these I KNEW I HAD TO MAKE THEM! My friend is well, not only pregnant, but a huge fan of chocolate covered strawberries, so I knew they would be a hit! And boy were they!! The idea of this Cheesecake Stuffed Strawberry is just insane...and WHY DIDN'T I THINK OF IT!!! It is so easy to do and so delicious! With Valentine's Day right around the corner, wouldn't these be perfect for your sweetie!!!!???

Cheesecake Stuffed Strawberries with Chocolate Drizzle
(as seen on The Novice Chef)
2 crates of fresh Strawberries
1 box Jello No Bake Cheesecake (I actually used the sugar-free kind!)
Crushed Graham Crackers
Milk Chocolate and White Chocolate for drizzling (I used white and milk, but you can do whatever you prefer.)
Mix the cheesecake filling according to the box, let set in the refrigerator until set. Crush graham crackers by hand or use a food processor, set aside.
Wash your strawberries and cutoff the tops. Next, hollow out the strawberries, I followed Jessica's suggestion and used the end of a potato peeler to do this.
Once you have hollowed out all your strawberries, fill a pastry bag (or use a zip-lock bag) with your cheesecake filling. Gently fill each strawberry until the filling is slightly overstuffed. Dip each end into the graham cracker crumbs and set aside.
Heat up your chocolate carefully until the chocolate is melted thoroughly. Spoon the melted chocolate into zip-lock sandwich bags. Cut off a very small tip and squeeze the chocolate over the strawberries.
These strawberries are so delicious, I rate them a 10 for sure! So go make them, what are you waiting for! ;o) Oh and don't forget to check out Jessica's blog, The Novice Chef!

Saturday, February 6, 2010

Blue Cheese Mashed Potatoes

This recipe is the side kick to the Buffalo Chicken Meatloaf we had. I wanted to have something to go along with the meatloaf, but I wasn't sure what to make. I had tossed around the idea of just having a veggie, but then second guessed myself and decided I wanted something better. So I got to thinking, what if I used some of the flavors from the meatloaf to make a side dish. Then I realized I had some leftover red skin potatoes at home and thought I could turn those into blue cheese mashed potatoes!! I was nervous about trying them out, but they turned out wonderful and were so creamy. They really complimented the Buffalo Chicken Meatloaf! I do have to say, I just sorta "made it all up" so my measurements may not be exact, but the good thing about mashed potatoes is that you can give them a taste and then add more to them if it needs it :o)

Blue Cheese Mashed Potatoes
(recipe by Liesl)
6 - 10 small red skin potatoes washed and cut into quarters
1/2 skim milk (maybe more, maybe less)
sea salt
fresh cracked pepper
fresh parsley (just a handful of rough chopped parsley)
reduced fat blue cheese crumbles (I used about 3 tablespoons...just add to taste)
Put potatoes in a pan filled with water over medium high heat. Bring potatoes to a boil and cook until fork tender. Remove from heat and strain.
Put cooked potatoes in a deep bowl. Add milk, parsley, salt and pepper. Using a hand mixer blend together until somewhat smooth, but still has a few chunks to it. (Or you can make them completely smooth, I just wanted to have mine somewhat chunky.) Add blue cheese and stir with a spoon to incorporate into potatoes. Serve warm.

Friday, February 5, 2010

Buffalo Chicken Meatloaf

My friend Erin, from Erin's Food Files, emailed a recipe for Buffalo Chicken Meatloaf several weeks ago. I was so excited when I got the email, because this meal is right up my alley. It seems like towards the end of last year I had definitely gotten off track with eating healthy and working out as much as I used to, so this meal was just perfect! I am always looking for new ideas for a healthy recipe, but often am sceptical that they may lack flavor...this dish definitely had flavor. In fact, it was so delicious that I can't wait to make it again! I decided last minute to try whipping up some Blue Cheese Mashed Potatoes (which you will see tomorrow) with some leftover potatoes I had to go along side the meatloaf. They were a great addition, not as healthy as the meatloaf, but hey they were delicious with every bite!
Buffalo Chicken Meatloaf
(as seen on Erin's Food Files, recipe from Biggest Loser Cookbook)
Olive oil spray
2/3 cup old fashioned oats
1/2 cup fat free milk
1/3 cup hot sauce, plus more to sprinkle on top
1 lb extra-lean ground chicken breast
1/4 cup finely chopped celery1/4 cup shredded carrot
1/4 cup finely chopped sweet onion
2 large egg whites, lightly beaten
1/4 teaspoon salt
1/2 cup crumbled reduced fat blue cheese

Preheat oven to 350F.
Lightly mist a 9” x 5” x 3” nonstick loaf pan with olive oil spray.

Combine oats and milk in a medium size mixing bowl. Mix well. Let stand for 3 minutes or until oats are softened. Stir in hot sauce until well mixed. Add chicken, celery, carrots, onion, egg whites, and salt. With fork, mix ingredients well. Add blue cheese and gently mix.

Transfer mixture to pan and spread so that top is flat. Sprinkle on a couple shakes of hot sauce and spread evenly. Bake 35 to 40 mins or until chicken is no longer pink. Cut into 8 slices. Makes 4 servings.
Stay tuned for tomorrow...Blue Cheese Mashed Potatoes!

Wednesday, February 3, 2010

Monkey Muffins

3 words -
OH - MY - GOSH

WOW! These were amazing!!!!!!! This recipe was another one that popped up in my Google Reader at just the right time. The hubs had told me he needed a breakfast dish to take to school, and I wanted something that would travel well. I saw this recipe for Monkey Muffins on The Pioneer Woman Cooks, and knew I had to make it right away.

The were pretty easy to make and very tasty. I do have to say, that they are better served immediately out of the oven, all nice, gooey and warm. But if you can't serve them right away (or have leftovers) they do taste just as good warmed up in the microwave for just a few seconds.

I loved this recipe and plan on keeping it around, especially for company that's here for breakfast! They were so delicious and fun! I have always enjoyed Monkey Bread, but I don't think I will ever make it again after trying this recipe. They were so cute and so yummy!
Look at that sweetened condensed milk drizzle on top....yum!

Monkey Muffins
(from The Pioneer Woman Cooks)

Refrigerated Biscuit Dough, Cut Into Thirds (I can't remember how many cans I used, but just decide how many you want and then buy that many biscuits.)
Butter
Sugar
Ground Cinnamon (I used my cinnamon grinder, I love freshly ground cinnamon!)
Sweetened, Condensed Milk

Preheat oven to 375 degrees.

Add 1/2 teaspoon butter to muffin tins. Sprinkle in sugar and cinnamon.

Roll dough into walnut sized balls (or cut refrigerated biscuit dough into thirds). Place three into each muffin tin.

Top with 1/2 teaspoon butter. Sprinkle on more sugar and cinnamon.

Allow dough to rise, if applicable, or just go ahead and bake for 15 minutes, or until golden and bubbly.

Remove from oven and immediately drizzle plenty of sweetened condensed milk over the top of each one. (Trust me you can't drizzle "too much"!!!) Allow rolls to sit for a little while to absorb the sweetened condensed milk.

Scoop out with a spoon and invert onto plates. (Drizzle more sweetened condensed milk if desired!)

**Pioneer Woman has step-by-step pictures of how to do the Monkey Muffins, check it out here.**

Monday, February 1, 2010

Sausage Crescent Breakfast Casserole

I can't believe I have never shared this recipe! I found this recipe on a friend of mine's blog (Stephanie of Macaroni and Cheesecake) forever ago. It is a go to recipe for me when I need something to make for the hubs to take to school or if I am going to have company for breakfast. It is so easy to make and so delicious! I always get compliments on it and it always seems to be devoured within 10 minutes of me setting it out! I try to use the "low-fat" versions of ingredients when I can, but you can certainly sub them for the "full-fat" if you prefer. Try these out soon....but just to warn you, it's hard to eat just one piece!
Sausage Crescent Breakfast Casserole
(from Macaroni and Cheesecake)

1 8 0z. container fat free cream cheese
1 lb. sausage
2 cans reduced fat crescent rolls

Brown sausage in skillet. Add cream cheese to sausage and mix until combined. Line a 9 x 13 glass baking dish with one package crescent rolls. Top with sausage & cream cheese mixture. Top with remaining can of crescent rolls. Bake according to the directions on the crescent roll can.